4L60E Rebuild Resources
DIY Video Resources
Transmission Bench video series
The video series created by Transmission Bench is an excellent in depth rebuild process for a factory style rebuild. One suggestion is that you always replace the sealing rings on the pump stator and input shaft to avoid having issues. Make sure to check the list of things to check and possible additional checks in the list below that you can perform and might not be mentioned in the video.
Nick’s Transmissions video series
The video series created by Nick’s Transmissions is an excellent resource for factory rebuilds, performance rebuilds, miscellaneous tips, etc.
4L60E Rebuild Resources – Tips per Component
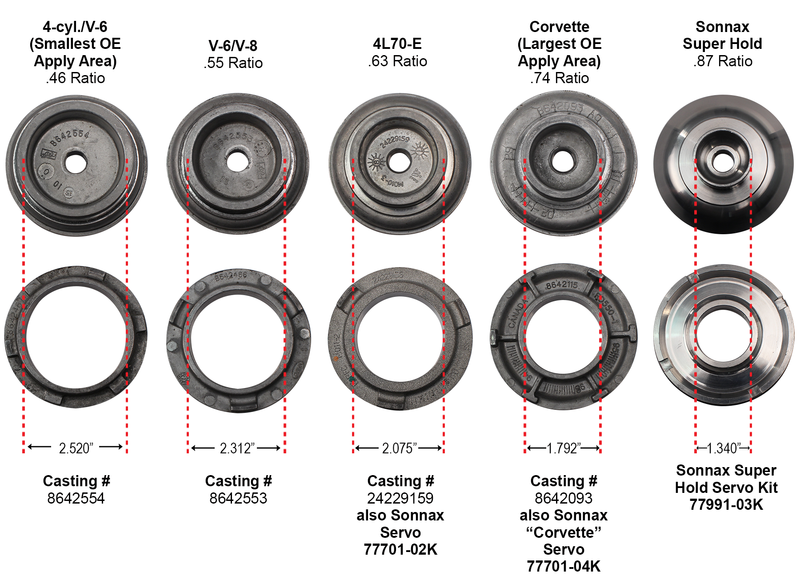
4L60E Transmission case and servo
After disassembling and cleaning the case, always make sure to check the 3rd accumulator capsule for leakage. If it is leaking you can try resetting the checkball using a punch and hammer by giving it a few light taps. Ideally, you would want to replace the capsule if it is leaking. Check link below for the process.
Watch the video below starting from the 4:30 min mark.
Make sure to check that the servo is applying and releasing the band correctly after you have installed the band and before installing the pump. Video to come.
4L60E Transmission pump
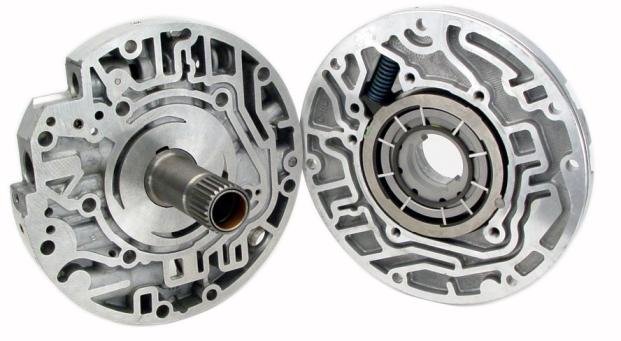
Check both surfaces of the pump where the rotor rides. If any of them have wear marks you can catch with your fingernail, then they will need to be machined or replace the pump. If the rotor broke inside the pump, you will most likely need to machine or replace the pump. I would not recommend reusing that pump. After checking both surfaces are fine, check for clearances. If the clearances do not check out, replace the pump, or the rotor and slide assembly. Otherwise, you run the risk of the rotor binding up and breaking after the rebuild.
Watch the video below to learn how to check pump clearances
If lockup was working fine, then most likely, you will not need to replace the TCC valve. If you want to replace it, you can use Sonnax TCC apply valve kit for your application. Replace the boost valve with a stock one or a Transgo 0.500″ oversized valve to increase the line pressure.
After assembling the rotor inside the pocket with all the vanes and rings, add a few drops of fluid and make sure it spins freely by spinning it by hand about 10-15 times. Then once you have bolted both parts of the pump together, set it on the torque converter hub, make sure the rotor engages the tabs on the torque converter hub and spin it 5-10 times in both directions to make sure it spins freely.
4L60E Reverse input drum

Check with lamp for straightness. Place a straight edge across the surface and shine a lamp from the other end. If you see light coming through then replace the drum. If it checks out, you can use a red scotch brite pad to clean the surface.
Watch the video below at the 4 min mark to learn how to check the drum.
4L60E Input drum
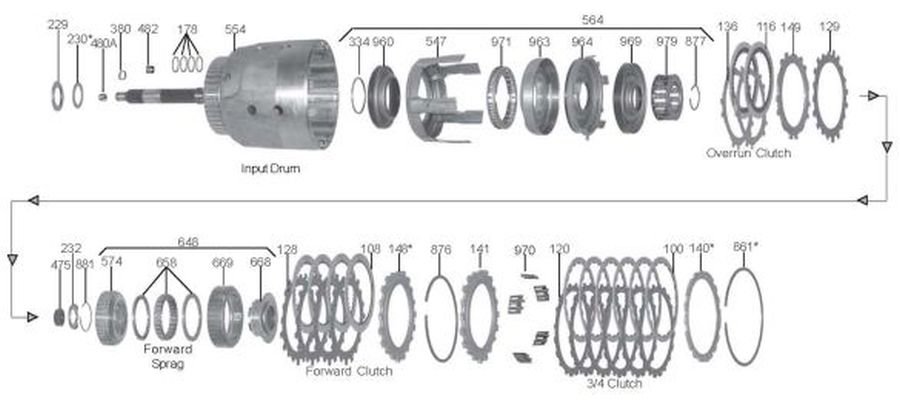
This can be one of the main sources of failure for the 4L60E transmission. The drum sometimes leaks from the area where the input shaft is pressed into the drum. It is a good idea to do a “wet pressure test” where you assemble the drum, then flip it over, add fluid to that area and apply compressed air to the 3-4 feed hole and check for bubbles. Even if it passes that test, it can still leak when the fluid/drum reach operating temperature of 160F, which can cause the aluminum drum to expand causing a leak. If you rebuild the transmission for a 3-4 burnup and it still slips after the rebuild even though all other sources of 3-4 burn up have been addressed, then the drum most likely develops a leak at operating temperature. The only option there is to replace the drum.
Watch the video of an input drum that FAILED the pressure test.
If the drum fails the pressure test you can try to “repair” it. Even if you want to be safe and try to prevent the leak from developing in the future you can follow the process explained in the video. Some builders do this to all their transmissions, others advise against pressing the shaft out if it is not leaking. It will be up to you if you want to try it or not if you don’t have a leak. The method involves pressing the shaft out of the drum (you will need access to a press), and add retaining compound, Loctite, or JBWeld to the shaft and press back in.
Watch the video showing the repair process.
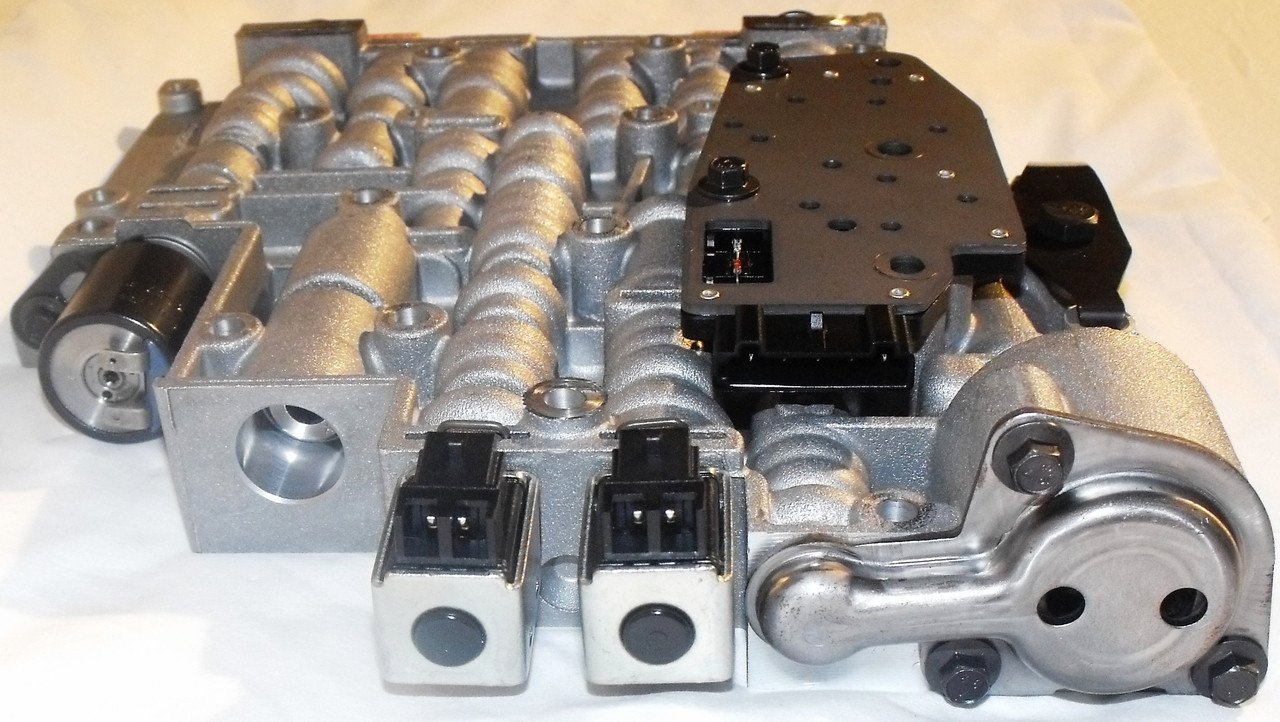
4L60E Valve Body
When reassembling the valve body, an inexpensive way of blocking the PWM valve is to use two 0.25″ checkballs. Watch the video below.
Watch the video of how to block the valve at the 8:30 min mark.
Check resistance on the shift solenoids. It should be somewhere between 19-24 Ohms. Replace the forward accumulator plastic piston with an aluminum piston as well as the plastic 1-2 accumulator piston with an aluminum one.
If the hole for the 3rd gear checkball has been enlargened to where the checkball is stuck or goes through on the separator plate, you can use the fitzall repair kit. If the hole is enlarged, but the checkball does not go through, you might be able to close it back up by hammering the checkball hole. If the separator plate does not need repair (or was repaired with a hammer) you can replace the steel checkball with a Torlon checkball to prevent it from happening again.
Watch the video showing the repair process using the Fitzall kit.
Rebuild Now
Discover expert tips and guides to rebuild your 4L60E transmission.